


First Roundhouse: Walls
Our wall was made from wattle and daub which is a palisade made from woven branches, plastered with a mixture of earth, clay, horse manure and straw, all in equal proportions. It was a load bearing walls (i.e. it holds the roof up) unlike the wattle and daub in-fill seen in the timber framed structures of the Middle Ages.
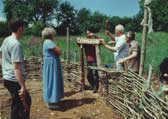
We started by gathering poles about 6 feet (2m) in length of whatever wood we could find. We needed 64 in total, eight main posts to which the eight main rafters would be jointed, 8 secondary posts for the secondary rafters, and 48 others to fill in the gaps and allow a tight weave. The main sixteen posts were charred and made to sit in a hole on top of a flat stone, while the others were simply spiked and driven in. The recommended depth for a load-bearing post is at least a third of its above ground height, although having said that, Iron Age Roundhouses have very shallow post holes, not usually deeper than a foot or so. The charring helps prevent rot, although all the posts rotted to some extent and from our experience birch proved the most rot-resistant.
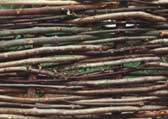
We then trimmed the tops of the posts to the required height (allowing room for post to rafter joints), with a gentle rise towards both doors. The wood most commonly used for making wattle hurdles is hazel because it grows straight and quickly when properly coppiced and it takes bending very well. We had to use whatever coppice was available which was primarily a mixture of hazel and birch. An important point to remember is to layer the wattle evenly around the whole wall, and do not wattle in sections, for this will seriously weaken the structure.
To mix the daub (or plaster) we dug two, one foot deep circular pits and stamped around with our wellies until the mixture of earth, clay, horse manure and straw reached the desired consistency. The daub needs to be trampled for a good long while until it gets so tacky that lifting your foot becomes a hard task, and losing your wellies a very real prospect. Describing really good daub is hard to do, but once you've made good daub you'll know, and it won't be hard to repeat. We recommend you prepare it on a dry day so that you can control the water content. It should go a dark green kind of colour.
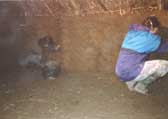
There are two ways of applying daub, carefully applying it to the wattle and kneading it into the weave with your fingers, or just throwing daub balls at it (We prefer the first method because it saves considerably on wastage. I also recommend applying two layers of daub instead of one thick one (although you might have different opinions on this.) In our experience it dries better and quicker this way. You have to dampen the first layer slightly to make the next stick. For this we used garden sprayers, but a fine mist from a hose would do.
Having waited for it to dry, we whitewashed it on both sides with thick coats of lime-wash. Because lime is breathable, the wall only has to dry enough to take the wash, for it can still dry through the lime.
Home | News
| First Roundhouse | New
Roundhouse |Gallery Index
The Project | Resources
| Contact | Help
All content: © The Roundhouse Project 1997-2010