


New Roundhouse: Rafters
We decided to use ropes and pulleys to lift the rafters, and to the best of my knowledge, no rafter was lifted using the same technique twice. There was always either an obstacle in the way of the rope, or there was a new and more efficient pulling method to try.
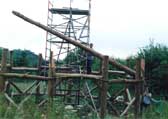
We erected a 25 foot tall scaffold in the shape of a pyramid with a long spike on top wich was to be the pulley point, and for it to be any good, it had to be taller than the prospected height of the house. Once the first rafter was lifted up to its correct position, we could tie it to the steel spike enabling us to untie the ropes and move on. To ease the hoisting process we moved the first rafter, and rested its thin end on the appropriate wall beam.

The pulling work was done with the aid of a Land Rover, and after several attempts (eleven actually) we discovered the most successful. A rope is attatched to the Land Rover which heads off to the pulley at the top of the spike. This pulley has three wheels, which means it can hold three lengths as opposed to the normal one. The rope goes through this pulley and heads off for another pully which is attatched to the rafter opposite. It goes through this pully and back up towards the spike pulley. It then goes through that pully and back down to the rafter where it is tied to it. This method halves the weight you have to pull. Through experimentation we realised that with a more advanced knowledge of ropes and pulleys, rafters could have been hoisted by hand relatively easily.
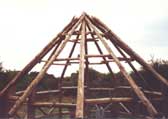
Having erected four rafters (which were, by now, freestanding) there remains the problem of how to joint two more rafter ends in each of the four quadrants of the apex. Our solution was to rest rafters on the back of others. for example, if there were three rafters in a row, the middle of which was already in place, the other two would join together near the apex, and rest on the back of the middle one. For this to work, the appropriate tenons need to be 'aimed' at the right spot on the back of the rafter before being cut. Now that all rafters were in the air, we could secure them in place with two ring beams. These were spaced along the rafters at intervals of one third of the rafter length, inside the house. These were individual pieces of Larch, in the round, that were tied and pegged in place. To fill the gaps in the roof we placed twelve small 'half-rafters'. These hang off the lowest ring beam and rest on the wall beams. To bring them out flush to the outside of the roof, we put in spacers.
A friend of ours, Ewart Schofield, is a tree surgeon (www.esatreecare.co.uk) and without his equipment and his generosity, raising the roof would have been ten times harder, and ten times more dangerous! We thank him profusely.
Home | News
| First Roundhouse | New
Roundhouse |Gallery Index
Project | Resources
| Contact | Help
All content: © The Roundhouse Project 1997-2010